Kettlebell Windmill: Form, Benefits & Variations
⏱️ Estimated Read Time: 6 minutes
🧠 TL;DR
- Kettlebell Windmill: Form, Benefits & Variations offers effective, accessible movements for targeted results.
- This guide is designed to help you move smarter, build strength, and stay consistent.
✍️ Summary
This post explores kettlebell windmill: form, benefits & variations in a way that’s actionable and easy to follow. Whether you're new to this style of training or leveling up, it includes practical takeaways for your routine.
📚 Table of Contents
Kettlebell Exercises for Seniors and Older Adults: Enhancing Health and Independence Kettlebells can provide significant opportunities to train all those physiological qualities in one modality. We will cover in detail the different qualities that kettlebells can work to improve during training and specific kettlebell exercises for seniors. This is not a comprehensive list as so many can be applied for different individual biology. That brings us to the purpose of this article. If you stick around this long, you understand that a) Active Aging Population needs exercise just like any other population and b) As we age, a decrease in bone mineral density and lean muscle mass as well as decreasing in the rapid firing of musculature are challenges we face as we age. Incorporating a kettlebell workout for seniors can help address these challenges effectively.
Get access to full interviews and workout plans in our memberships! View here!
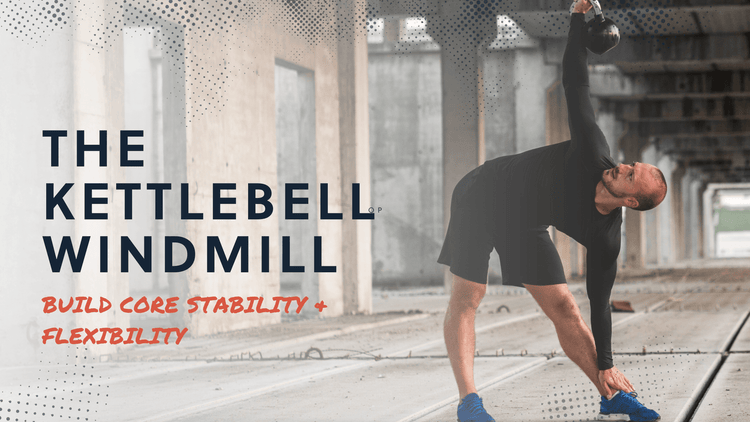
The windmill challenges your shoulder stability, core strength, flexibility and glute strength all in one. It’s a move popularized by old school strength athletes like Arthur Saxon typically done as a bent press or side press, but morphed into the straight arm windmill kettlebell exercise. It’s a show of strength and balance that creates a more capable, resilient athlete.
Get free kettlebell workouts here!
The kettlebell windmill has some distinct benefits that make it a useful exercise. These kettlebell windmill exercise benefits include:
-
It builds shoulder stability
The strength needed to keep the arm vertical combined with the wide range of motion creates a space for the stabilizers of the shoulder (the rotator cuff, scapular muscles, etc) to work double time. The stronger these stabilizers are the stronger and more secure your shoulders will be.
-
It builds core strength
As you drop into the bottom position and pull yourself back up you’re working your obliques, core, stabilizers of your spine, serratus and more. Building a strong core will always be valuable at creating a strong and useful physique.
-
It builds glute and hip strength
All hinges (Deadlifts, swings) will build glute and hip strength and so will the windmill. The added bonus of working the glutes unilaterally (one at a time) and anti-rotational strength as you fight to maintain a solid torso the entire time.
How to perform:
Set up with the bell in your right arm in the rack position. Stand with a slightly wider than hip width stance and point your toes 45 degrees or so to the left (away from the racked bell). Lift the bell overhead. Drive your hip back as you bring your upper body in the direction of your feet. Keeping your right arm vertical as you hinge and watching the bell to maintain stability pull yourself back to the starting position. Maintain tension to avoid flexing at the spine. Match your breath to the movement so as you stand exhale without releasing all tension.
Repeat.
Regress it down:
If you don’t have the requisite shoulder mobility then there are three regressions for you!
-
Bodyweight Only
This was the first thing I’d have my client do and for some people this was all they needed. The stress on their core and the lack of shoulder mobility made this the perfect starting point that was still fairly challenging.
-
Low Position
If they had the strength to hinge, but maybe didn’t feel secure having the bell overhead the entire time we’d bring it down. Letting the low hand hold the bell while maintaining the same pattern allowed my client to work on the core strength and simply hold their hand overhead to practice the mobility.
-
Chest Supported
This allowed my client to focus on the movement and create more load on the core. It takes the same weight they were holding in the low position and redistributes it to keep the focus on the upper body. This helps create the upper back tension and connection to maintain an extended spine throughout the movement
Get free kettlebell workouts here!
When to use it:
Personally I prefer using the kettlebell windmill as a primer or loaded mobility drill to get the most use out of it. I’ve chased heavier and heavier numbers, but the risk-reward ratio makes it a challenging one. You don’t want to go too heavy as you have less margin of error if form deteriorates. You also don’t want to fatigue with it.
If your form is on point and you’re hell-bent on using the movement to get stronger then focus on 3-6 CLEAN reps for 3-5 sets. Take plenty of time between sides and between sets to focus on perfect form.
If you’re looking to build some size I’d recommend presses, jerks, and push presses, but this can be a handy movement to pre-fatigue the shoulders if your weights are too low. 8-12 reps and then going into presses will challenge you significantly while putting the shoulder and upper back through plenty of time under tension.
If you’re looking for endurance go higher reps or throw it into a circuit work with reps 12 and up, but be INCREDIBLY mindful of your form. Even with light weight you can do some damage if form diminishes and you put yourself in an awkward position.
So there you have it; a deeper dive of the kettlebell windmill. A movement that will deliver strength, stability, mobility, and control. These kettlebell windmill muscles worked include the shoulders, core, and glutes. For more kettlebell workouts, programs, and tutorials subscribe to Living.Fit! Get free kettlebell workouts here!
Marcus Martinez
Master Kettlebell Coach
Want more guidance? Check out our Weekly Dumbbell Workout #1.
📝 FAQs
How often should I do these exercises? +
2–3 times per week is a good starting point for most people.
Do I need equipment? +
Many of these can be done with just your bodyweight or a single kettlebell or dumbbell.
Can beginners do these routines? +
Yes! These movements are designed to scale with your fitness level.


